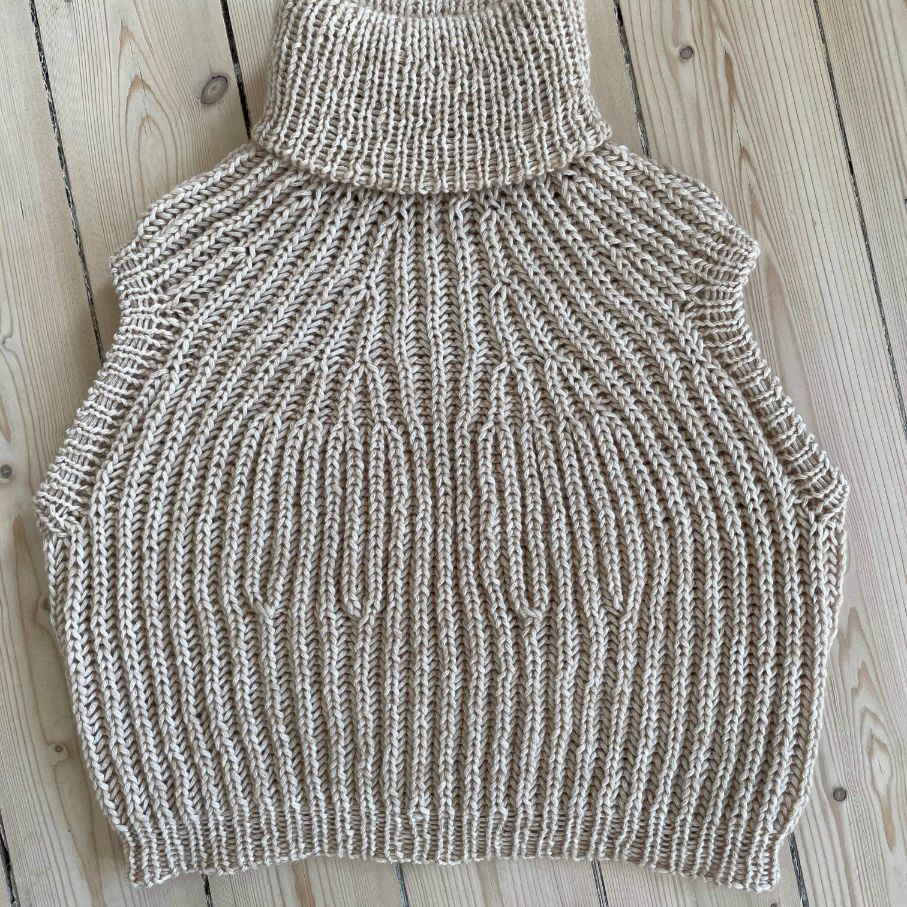
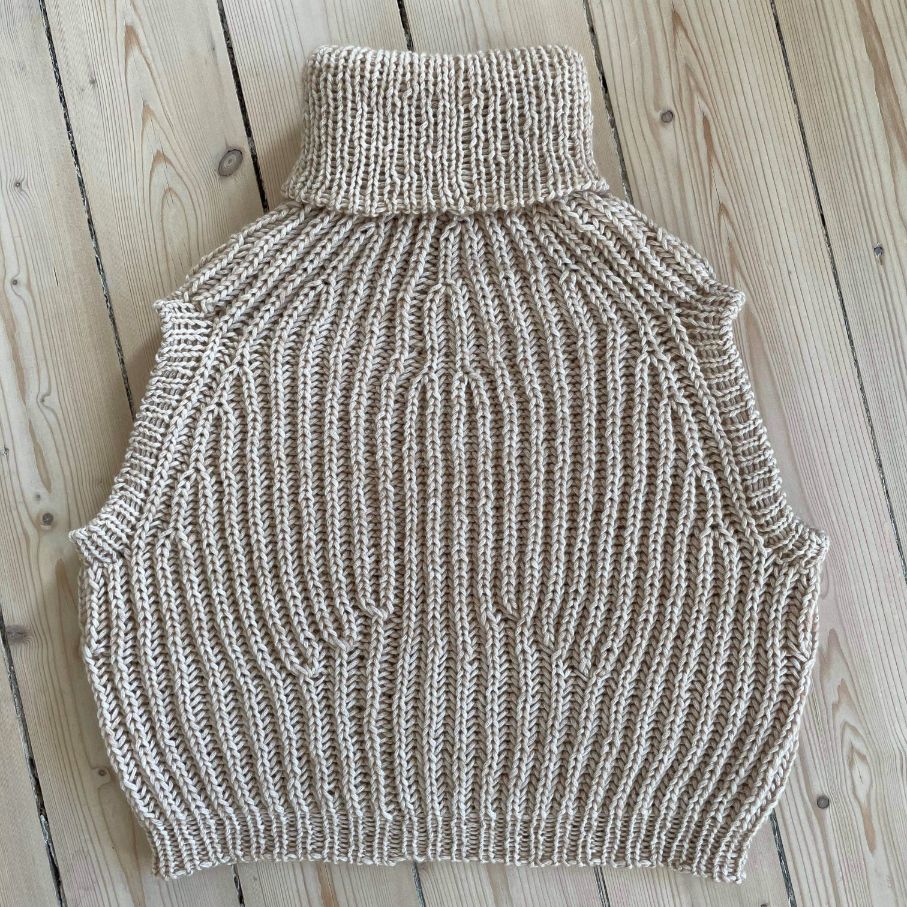
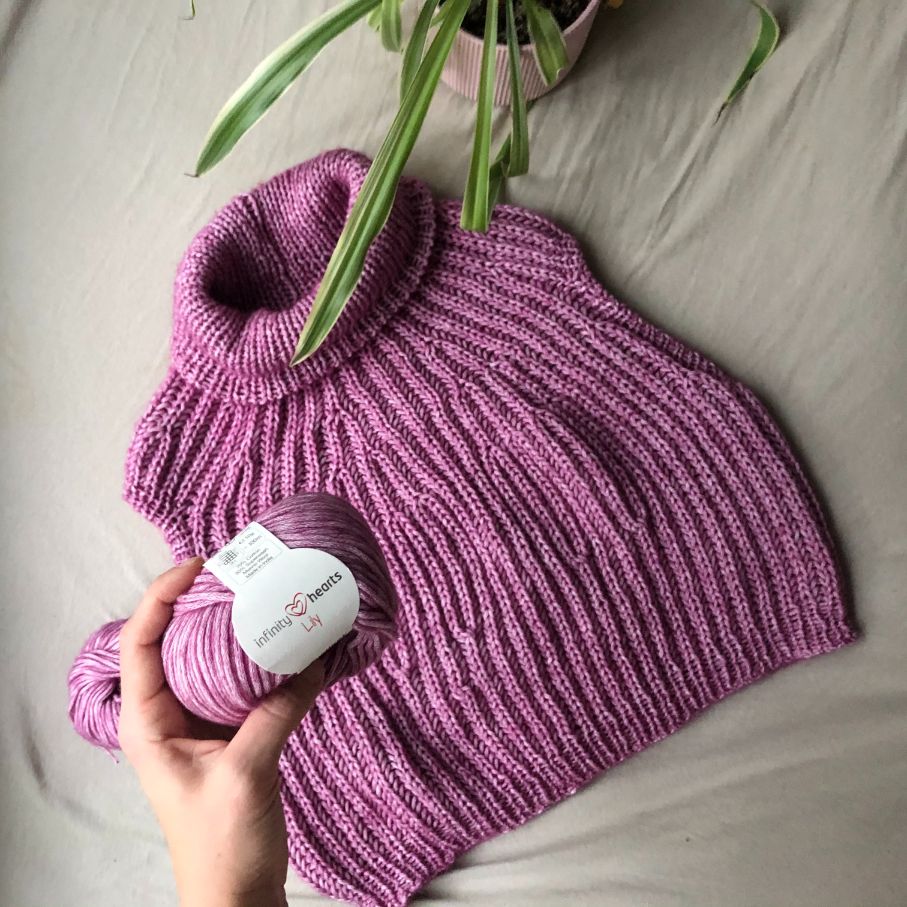
Knitted Wind Slipover


The slipover is worked top-down in double knitting and brioche stitch. It has a large roll-neck designed to keep you warm even on a windy beach. Furthermore, it has a short fit, since the neck is in focus. The increases are designed to underline the feminine curves in a subtle way (this also means that during the work with this slipover, you need to make sure to place the increases correctly).
Sizes and measurements
Sizes: Small (Medium) Large (X-Large)
Measurements: 88 cm (92 cm) 104 cm (114 cm)
Materials
Yarn:
Yarn quantity:
5 (6) 6 (7) balls of Infinity Hearts Lily.
Gauge:
Double knitting: 24 s x 22 rw (needle size 7 mm)
Brioche stitch: 14 s x 17 rw (needle size 6 mm)
Needles:
Circular needles 5 mm (100 cm), 6 mm and 7 mm (40 cm, 80 cm and 100 cm). It is a good idea to work with interchangeable circular needles - they make it easy for you to change needle size during the work.
Or the size you need to get gauge.
Additional materials:
1 tapestry needle for weaving in the ends
Abbreviations
k = knit
p = purl
ktog = knit together
Technique elaboration
Italian cast on - picture guide here.
Brioche stitch - picture guide here.
Increasing and decreasing in brioche stitch - picture guide here.
Pattern
The sizes in pattern are the following: S (M) L (XL).
Roll-neck:
Co 75 (80) 86 (96) s with circular needle 7 mm using Italian cast on. Work 2 rw in double knitting in the flat to stabilise the cast on. Work double knitting in the round, until the work measures 20 cm. The roll-neck is now finished (it is your choice whether you want to make it shorter or longer). The beg of the rd is the middle of the back.
Yoke
Change to needle size 6 mm. On the next rd, work decreases like this: “k1, k2tog”. Repeat from “ to “ throughout the rd. Now you have 50 (54) 58 (64) s.
Work approx 1 (1) 1 (1) cm in brioche stitch. End with a rd where the purl s are worked.
Work 1 rd with increases in the 1st s (a knit s) and again every 6th s (also knit s). Now you have 66 (72) 78 (84) s.
Work approx 4 (5) 5 (6) cm in brioche stitch. End with a rd where the purl s are worked.
In the next rd, make an increase in the 5th (1st) 3rd (6th) s. Then, increase again in every 6th (8th) 8th (8th) s (all of which are knit s). Now you have 88 (90) 98 (104) s.
Work another 4 cm in brioche stitch.
The work now measures approx 10 (11) 11 (12) cm measured from the shift from roll-neck to yoke. The slipover is now divided into back piece, 2 shoulders and front piece.
Work 16 (18) 18 (20) s in brioche stitch (right-hand side of the back), work 12 (12) 13 (13) s in rib (k1, p1) and place these 12 (12) 13 (13) s on a stitch holder (right shoulder), work 32 (32) 36 (38) s in brioche stitch (front piece), work 12 (12) 13 (13) s in rib (k1, p1) and place these 12 (12) 13 (13) s on a stitch holder (left shoulder), work the remaining 16 (15) 18 (20) s (left-hand side of the back).
The front piece and back piece are now worked separately and later joined under the armholes.
Back piece:
Begin with the back piece. Be aware that because you work in brioche stitch, the “direction” shifts at the middle of the piece where the stitch marker is placed. Continue with this shift in the middle as it yields a better result when the sides are joined again. (NB: The beg of the rd is not placed precisely in the middle in size M - move the stitch marker 2 s to the left.)
Work in brioche stitch in the flat for approx 2 (2) 2 (2) cm. To create a neat edge and make it easier to pick up s for the armhole, do not work the outermost purl s, but merely slip it and work it from the rs.
Make an increase on the rs (the side facing outwards when wearing the slipover) in the 2nd knit s from the armhole at both ends and in the two knit s on each side of the marker. The back piece now has 40 (41) 44 (48) s.
Work approx 3 cm in brioche stitch.
On the rs, make another increase on each side in the outermost knit s that is not an edge s. The back piece now has 44 (45) 48 (52) s.
Work approx 4 (5) 5 (5) cm in brioche s - with size XL, make an increase after 3 cm on the rs in the outermost knit s at both ends. You now have (56) s in size XL.
On the rs, make another increase on each side in the outermost knit s that is not an edge s. The back piece now has 48 (49) 52 (60) s.
Work approx 3 (4) 4 (4) cm in brioche stitch. The work now measures approx 23 (24) 24 (27) cm measured from the shift from roll-neck to yoke.
(Not size S) On the rs, make another increase on each side in the outermost knit s that is not an edge s. The back piece now has 48 (53) 56 (64) s.
(Also size S) Work 2 cm in brioche stitch and put the back piece on hold.
Front piece:
Be aware of which side faces which way when you begin working the front piece. The increases are worked on the rs, i.e. the side facing outwards when wearing the slipover. This is important, because the increases are part of the design.
Now make 4 increases at the middle of the front. These increases are part of the “branches” across the chest. Therefore, make sure that the numbers fit with your body and your work. The increases are worked in the “legs” of the two middle increases on the front piece (see picture). Make 2 increases in each “branch” in the middle: The front piece now has 40 (41) 44 (46) s.
Work approx 2 (3) 3 (4) cm in brioche stitch. End by working the purl s.
On the rs, make an increase on each side in the outermost knit s that is not an edge s. The front piece now has 44 (45) 48 (50) s.
Work 1 (1) 1 (1) cm in brioche stitch. End by working the purl s.
Make increases in the 8 legs from the previous increases in the middle of the front (see picture). The front piece now has 60 (61) 64 (66) s.
Work approx 4 (7) 5 (6) cm in brioche stitch.
(Not sizes S and M) On the rs, make another increase on each side in the outermost knit s that is not an edge s. The front piece now has 60 (61) 68 (70) s.
End by working the purl s.
Joining the front piece and back piece:
Before joining the pieces, it is important that you make sure that the two sides fit together with regards to whether you ended with k or p.
The back piece measures approx 22 (26) 26 (29) cm while the front piece measures approx 22 (22) 24 (26) cm. The difference is designed to give the neck piece a good fit.
The two sides are joined by casting on s under the armhole.
Begin at the stitch marker on the back and work the knit s to the edge, co 4 (7) 7 (8) s under the right armhole and continue working the s of the front piece, until you reach the other edge where you co 4 (7) 7 (8) s under the left armhole. Work the remaining s until you reach the stitch marker on the back piece. Now you have 116 (130) 138 (150) s.
Work approx 3 (4) 4 (4) cm in brioche stitch. End by working the purl s.
Decreasing and finishing:
Now make 2 decreases on the back.
Size S: Work 4 s and make 1 decrease in the 5th s (it will include both the 5th, 6th and 7th s). Continue working in brioche stitch until 8 s remain before the beg of the rd. Now make 1 decrease in the 8th from last s (it will include the 8th 7th and 6th from last s on the rd). Now you have 112 s.
Size M: Work 4 s and make 1 decrease in the 5th s (it will include both the 5th, 6th and 7th s). Continue working in brioche stitch until 8 s remain before the middle of the back. Now make 1 decrease in the 10th from last s (it will include the 8th 7th and 6th from last s on the rd). Now you have 126 s.
Size L: Work 8 s and make 1 decrease in the 9th s (it will include both the 9th, 10th and 11th s). Continue working in brioche stitch until 12 s remain before the beg of the rd. Now make 1 decrease in the 12th from last s (it will include the 12th 11th and 10th from last s on the rd). Now you have 134 s.
Size XL: Work 6 s and make 1 decrease in the 7th s (it will include both the 7th, 8th and 9th s). Continue working in brioche stitch until 10 s remain before the beg of the rd. Now make 1 decrease in the 10th from last s (it will include the 10th 9th and 8th from last s on the rd). Now you have 146 s.

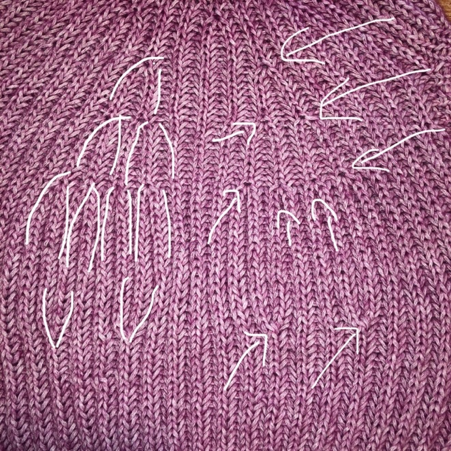
On the next rs rd, decrease on the front in the branches you have made here. Make 2 decreases on each side of the chest in legs 2+3 and 6+7 of the branches. See picture. Now you have 108 (118) 130 (142) s.
Work approx 1 (2) 2 (3) cm in brioche stitch. End by working the purl s.
In this rd, 4 decreases are made: 1 under each armhole and 1 under each of the 2 decreases made on the back (in the 7th (7th) 7th (9th) s on the rd and the 10th (10th) 10th (12th) from last s).
Now you have 100 (110) 122 (134) s.
Work approx 1 (2) 2 (3) cm in brioche stitch. End by working the purl s.
(Not size S) In this rd, 2 decreases are made under the 2 decreases last made on the back. In the (8th) 5th (11th) s on the rd and the (12th) 8th (14th) from last s. Now you have 100 (106) 118 (128) s.
Work approx 10 (10) 10 (10) cm in brioche stitch or continue, until the work reaches your desired length. End by working the purl s.
Change to needle size 5 mm.
Work approx 4 cm in rib: (k1, p1)
Bo with Italian bind off.
Armhole:
Begin at the bottom of the armhole, the same place where you previously cast on s.
The armhole is worked on needle size 7 mm, but since you need to include the s on hold, the s are cast on on the same needle size with which you worked the slipover (size 6 mm).
Pick up 4 (7) 7 (8) s in the s you cast on under the armhole. (You may choose to cast on 1 extra s at each end which is k tog with the first and last s on the next rd. This optional trick may be used to avoid holes.)
Pick up 26 (26) 28 (30) s from the back piece.
Work the 12 (13) 13 (14) s on hold in rib (be aware that you work in rib in the round so it needs to fit with the bottom). Again, consider casting on 1 extra s at each end and k them tog with the first and last s of the s on hold to avoid holes.
Pick up 22 (21) 22 (26) s from the front piece.
You now have a total of 64 (72) 72 (78) s (and possibly 4 extra s which are decreased on the next rd).
Change to needle size 7 mm.
Work approx 2 cm in double knitting and bo with Italian bind off.
This yields a small, tight armhole. If you want a larger armhole, pick up more s from the front piece and back piece or work the armhole in rib (k1, p1). If you are not able to pick up enough s, you may benefit from working the armhole in rib (k1, p1).
Designed by: @krea_lea (Lea Hansen)


 Österreich
  Belgique
  Bosna i Hercegovina
  България
  Κύπρος
  Česká republika
  Danmark
  Eesti
Eesti  Føroyar
  Suomi
Suomi  France
  Deutschland
  Ελλάδα
  Kalaallit Nunaat
  Magyarország
  Ísland
  Ireland
  Italia
  Latvija
  Liechtenstein
  Lietuva
  Lëtzebuerg
  Malta
Malta  Isle of Man
  Nederland
  Norge
Norge  Polska
  Portugal
  România
  Slovensko
  Slovenija
  España
  Sverige
  Schweiz
  Ukraїna
  United Kingdom