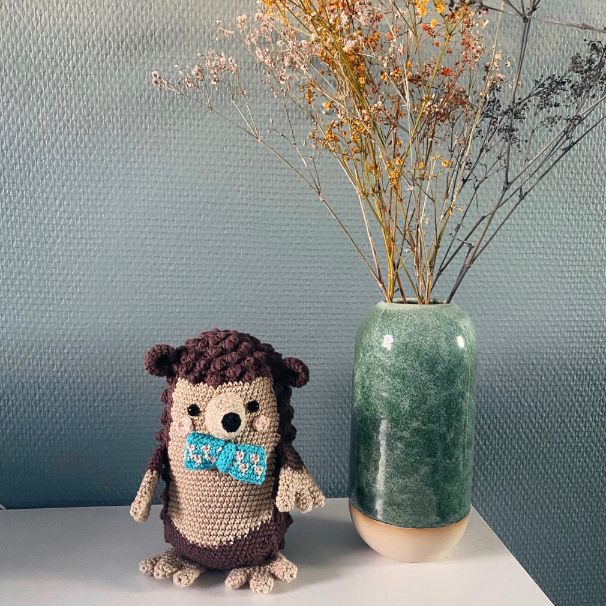
Free Crochet Pattern: Henry the Hedgehog
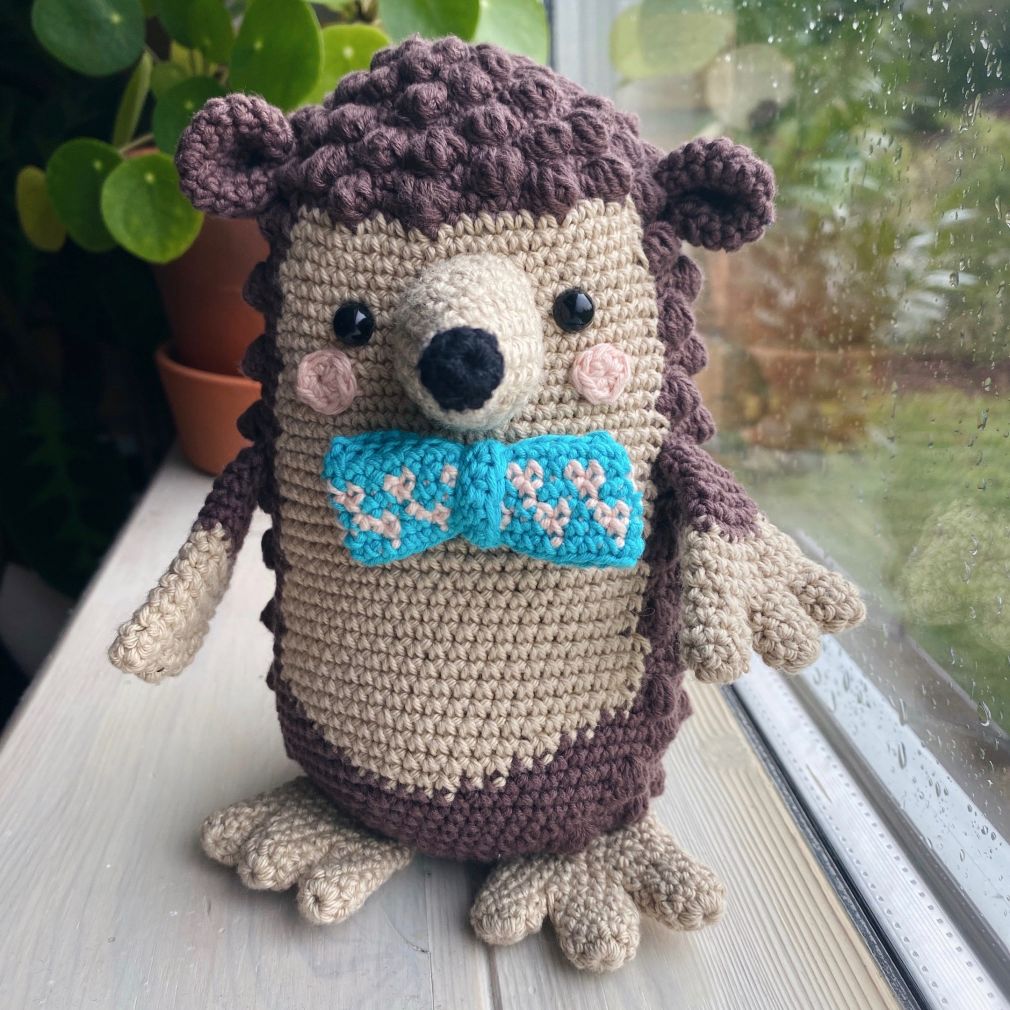
Henry is a patient little guy, but he certainly also knows how to enjoy life. Although many people think that Henry is a mole, his mother claims that he is 100% hedgehog. Big hands and feet run in the family, and Henry personally thinks it gives him a certain charm.
Henry has a great passion for colours and flowers, but because of his big hands, he has never really learned how to form or create all of his artistic visions. So he went with the safe choice and got a job as an accountant, but deep down he dreams of opening a gallery filled with magical colours. And who knows? Maybe someday, he will come to find that you can be creative - even if you have big hands.
Henry is the perfect toy for little ones, and perhaps a few grown-ups with an inner child as well. He is made with the softest Infinity Hearts Rose 8/4 cotton yarn, and as you will see at the end of the crochet pattern, you can easily transform Henry into a Holly. You can also choose to transform him into a tumbling ball, as his round shape is perfect for that.
Have fun making Henry the Hedgehog! (further comments from the designer can be found at the bottom of the page).
Henry is crocheted in Infinity Hearts Rose 8/4, which consists of 100% cotton.
Difficulty level is approx. 3/5.
Size
Henry the Hedgehog measures approx. 16cm in height.
Materials
- Crochet hook size 2.50 or 3.00mm (depending on your crochet tension)
- Needle for weaving in ends
Crochet tension: 26sx24rows=10x10cm
I crocheted Henry using a 2.5mm, but keep in mind that the needle size is indicative only. If you tend to crochet tightly, you can easily go up to 3-3.5mm. This way, you ensure that Henry's quills become large and airy. You need to get the crochet tension right in order to not go beyond the specified amount of yarn.
Yarn consumption
Infinity Hearts Rose 8/4 in the colours:
- 219 Brown – approx. 1 skein of yarn, 36g
- 213 Beige – approx. 1/2 skein of yarn, 17g
- 05 Pink – a little leftover yarn
- 125 Turquoise – a little leftover yarn
- 01 Back – a little leftover yarn
Other materials
- Safety eyes 8mm - 2 pcs
- Fibrefill
- Snap fastener (used for the bowtie, so you can change it out for a tie or another type of accessory)
Abbreviations
s= stitch
dc= double crochet
rnd= round
mr=magic ring
ch= chain stitch
sl st= slip stitch
bo= bobble (4 treble stitches joined in 1 s)
inc=increase (2 dc in the same s)
dec=decrease (join 2 s in 1 s)
( )x6 = repeat number of times
The number in parentheses after each round indicates the number of stitches you should have when the round is completed.
The colour change should always take place in the last stitch from the previous round. So, when you have 2 loops on the needle, and you grab the strand (of the new colour) again and draw it through the two loops.
Instructions
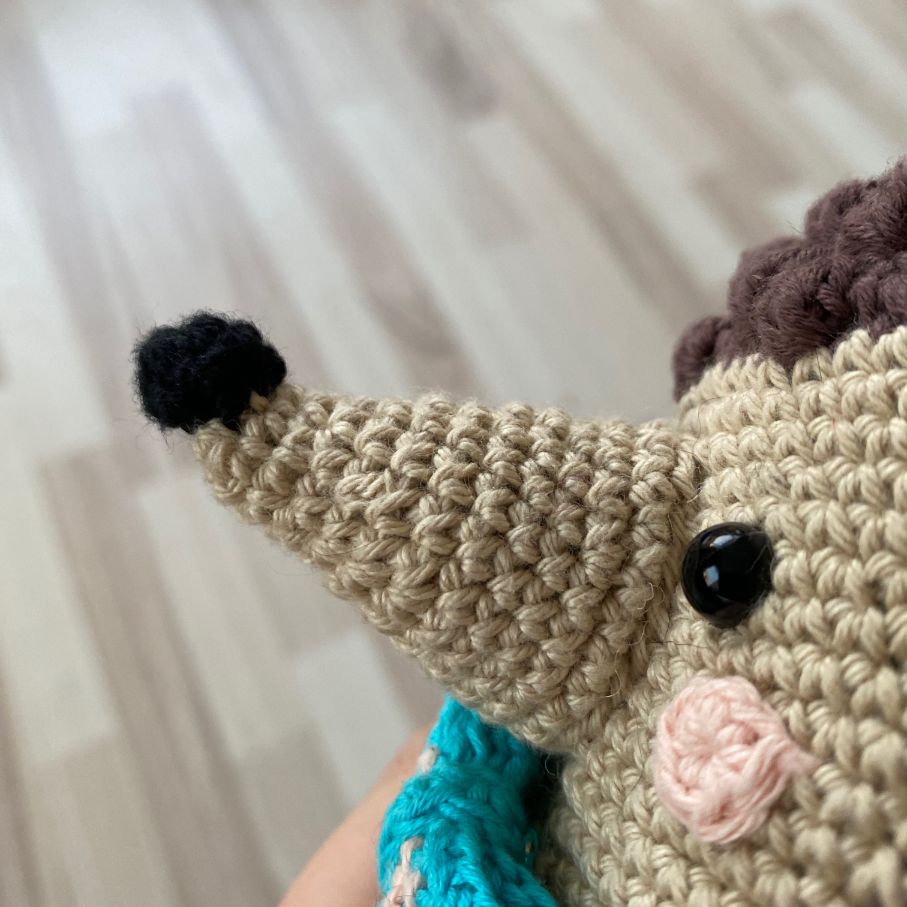
Nose tip (black) + nose (beige):
Begin with black
Rnd 1: 6 dc in a mr (6)
Rnd 2: 1 dc in all 6 s (6)
Finish with 1 sl st and break the yarn. Leave enough of the strand to sew the tip of the nose on later.
Begin with beige
Rnd 1: 6 dc in a mr (6)
Rnd 2: 1 dc in all 6 s (6)
Rnd 3: (2 dc, inc) x2 (8)
Rnd 4: (3 dc, inc) x2 (10)
Rnd 5: (4 dc, inc) x2 (12)
Rnd 6: (5 dc, inc) x2 (14)
Rnd 7: (6 dc, inc) x2 (16)
Rnd 8: (7 dc, inc) x2 (18)
Rnd 9-10: 1 dc in all 18 s (18)
Rnd 11: (2 dc, inc)x6 (24)
Rnd 12: 1 dc in all 24 dc (24)
Finish with 1 sl st. Break the yarn, leaving enough of the strand to sew on the nose later. Stuff the nose with fibrefill. Sew on the nose tip at round 1 and 2, so the tip is pointing up.
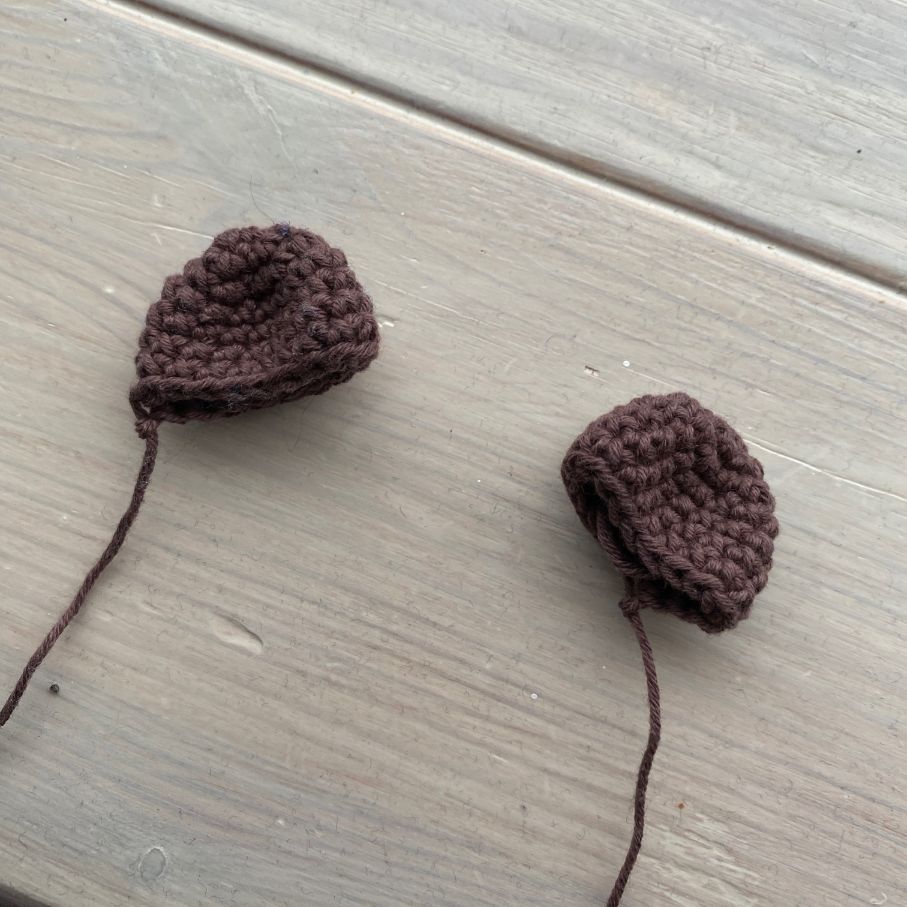
Ears (brown), make 2
Rnd 1: 6 dc in a mr (6)
Rnd 2: (1 inc)x6 (12)
Rnd 3: (1 dc, 1 inc)x6 (18)
Rnd 4-7: 1 dc in all 18 s (18)
Finish with 1 sl st. Break the yarn, leaving enough yarn for sewing with later.
Cheeks (pink), make 2
Rnd 1: 6 dc in a mr (6)
Finish with 1 sl st. Break the yarn, leave enough of the strand to sew on the cheeks later.
NOTE!
Before you begin on the body, read and understand the following:
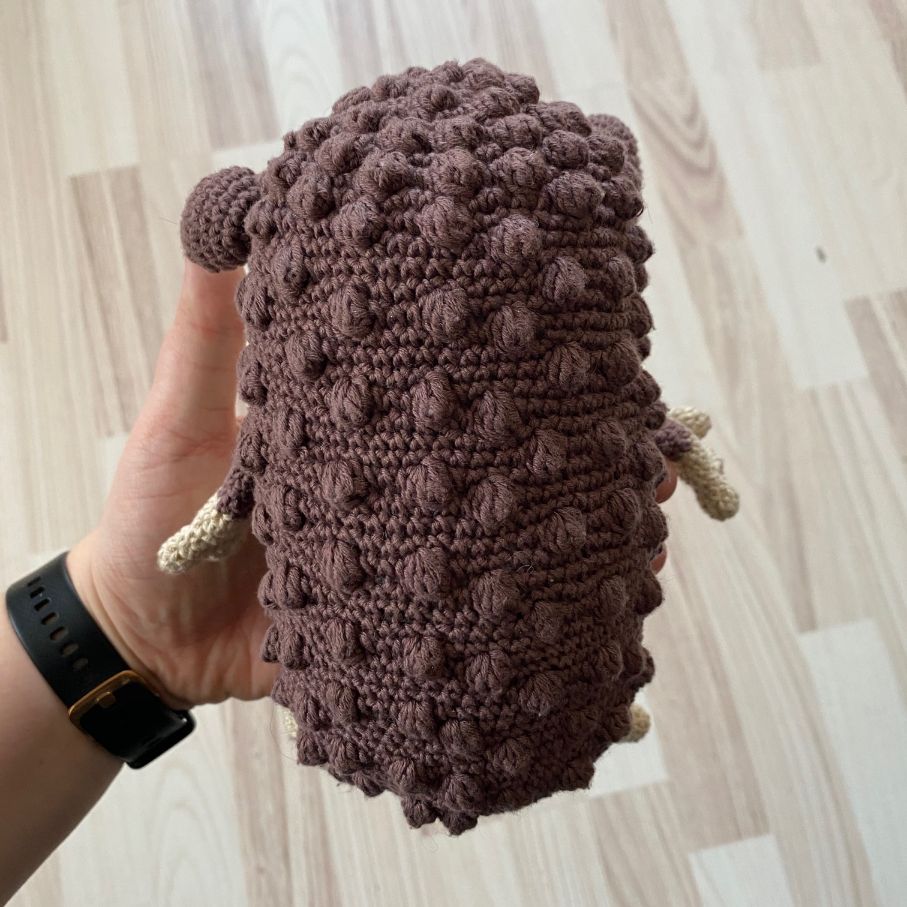
Since there will be a colour change from round 11, all underlined text indicates a colour change to beige and all that is not underlined should be brown. To make it easier to understand the pattern after round 11, imagine that each round consists of three parts: 20-22 brown stitches (quill pattern), 20-22 beige (the belly which is exclusively dc) and 20-22 brown (quill pattern).
From round 16, the work will be moved 1 stitch every 4th round to avoid the belly becoming crooked. The stitch is moved forward, so this means that you crochet 1 extra stitch on the previous round before a new round starts. (see the diagram on the next page)
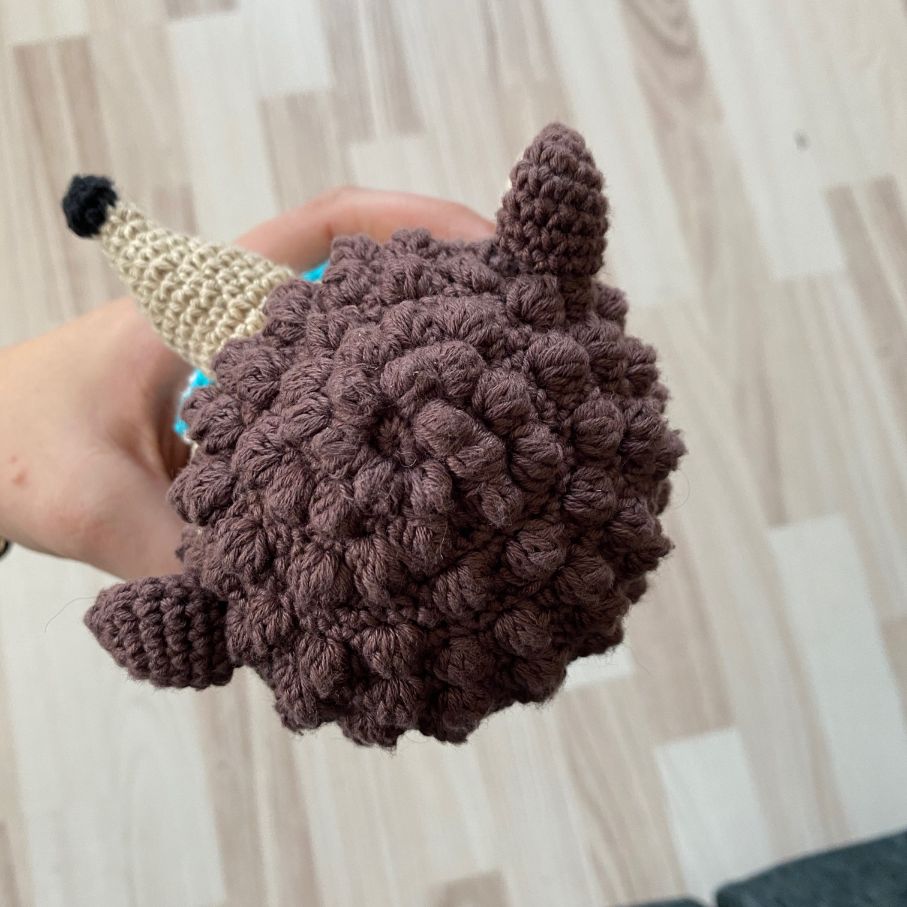
Head and body (brown+beige):
Begin with brown
Rnd 1: 6 dc in a mr (6)
Rnd 2: (1 bo+1 dc in the same s)x6 (12)
Rnd 3: (1 bo, 1 inc)x6 (18)
Rnd 4: (1 dc, 1 bo, 1 inc)x6 (24)
Rnd 5: (2 dc, 1 bo, 1 inc)x6 (30)
Rnd 6: (4 dc, 1 inc)x6 (36)
Rnd 7: (1 bo, 1 inc, 4 dc)x6 (42)
Rnd 8: (3 dc, 1 bo, 1 inc, 1 bo, 1 dc)x6 (48)
Rnd 9: (1 bo, 1 inc, 6 dc)x6 (54)
Rnd 10: (3 dc, 1 bo, 1 dc, 1 inc, 1 bo, 2 dc)x6 (60)
Rnd 11: 20 dc - change to beige 20 dc - change to brown 20 dc (60)
Rnd 12: (1 bo, 9 dc)x2 - 20 dc - 1 dc, 1 bo, 8 dc, 1 bo, 9 dc (60)
Rnd 13: (3 dc, 1 bo, 3 dc, 1 bo, 2 dc)x2 - 20 dc - (3 dc, 1 bo, 3 dc, 1 bo, 2 dc)x2 (60)
Rnd 14: as rnd 11 (60)
Rnd 15: as rnd 12 (60)
Rnd 16: *Crochet 1 extra stitch, and mark this as the start * as rnd 11 (60)
Rnd 17: as rnd 13 (60)
Rnd 18: (9 dc, inc)x2 - (9 dc, inc)x2 - (9 dc, inc)x2 (66)
Rnd 19: (1 bo, 10 dc)x 2 - 22 dc - (1 dc, 1 bo, 9 dc, 1 bo, 10 dc) (66)
Rnd 20: *Crochet 1 extra stitch, and mark this as the start * 22 dc - 22 dc - 22 dc (66)
Rnd 21: (3 dc, 1 bo, 3 dc, 1 bo, 3 dc)x2 - 22 dc - (3 dc, 1 bo, 3 dc, 1 bo, 3 dc)x2 (66)
Rnd 22: 22 dc - 22 dc - 22 dc (66)
Rnd 23-41 (19 rounds) repeated alternately in the order rnd 19+20+21+22. The last/41st round will be one rnd 21.
Rnd 42: 25 dc - 18 dc - 23 dc (66)
Rnd 43: (1 bo, 10 dc)x2, 4 dc - 14 dc - 5 dc, 1 bo, 9 dc, 1 bo, 10 dc (66)
Rnd 44: 29 dc - 10 dc - 27 dc (66)
Rnd 45: (3 dc, 1 bo, 3 dc)x2, 9 dc - 6 dc – 10 dc, 1 bo, 3 dc, 1 bo, 6 dc, 1 bo, 3fm (66)
Rnd 46: 66 dc (66)
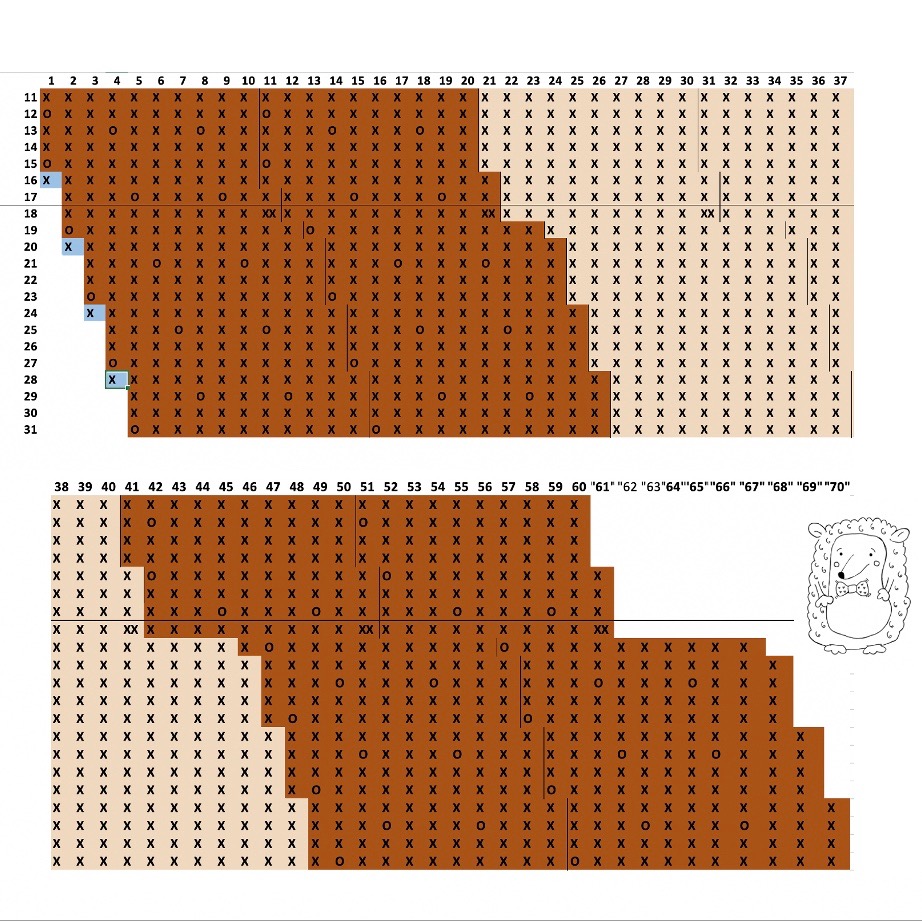
Diagram explanation:
- X = dc
- XX= inc
- O = bo
- X (in the blue box) = the extra dc that does not count.
Horizontal row: stitches
Vertical row: rounds (continue with the pattern until rnd 41)
Head and body continued:
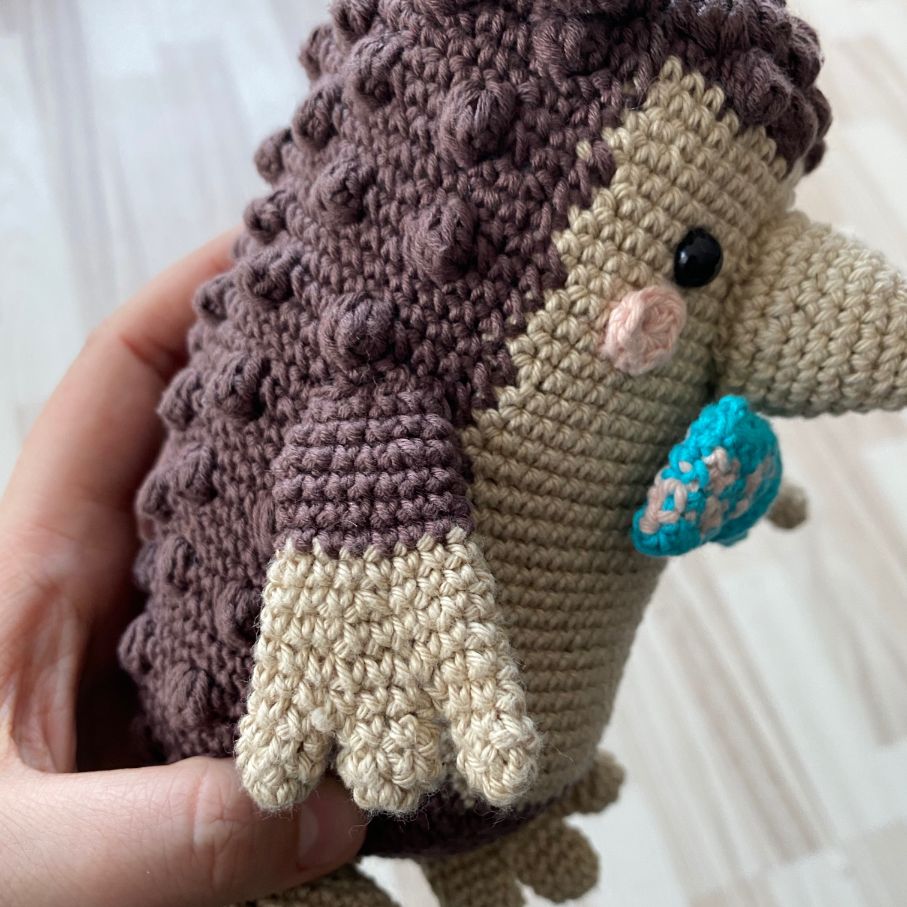
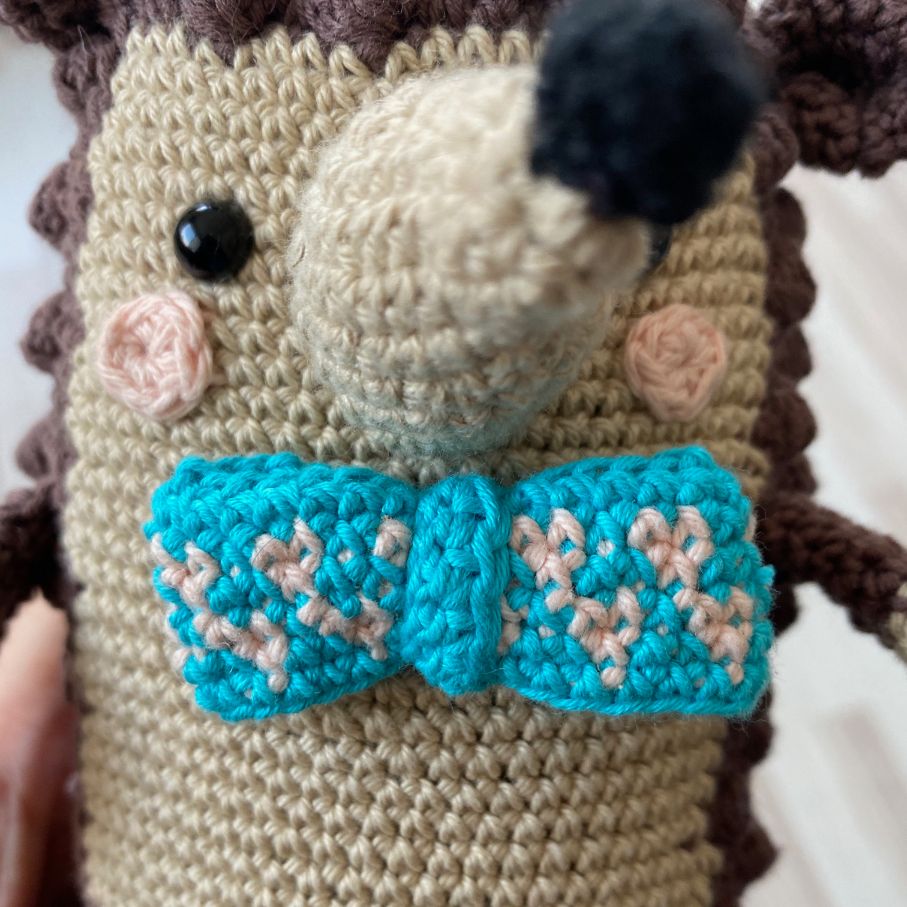
You now assemble the eyes, nose, cheeks and ears. Sew the nose in the middle of the belly (beige) piece from rnd 14-23. Place the eyes between rnd 17-18, approx. 2 stitches from the nose. Sew the cheeks on a little down across from the eyes by rnd 20-22.
You squeeze the ears together to create a fold on rnd 8-10. Stuff the body generously with fibrefill.
You now begin the decreases.
Rnd 47: (1 bo, 8 dc, 1 dec)x2, (9 dc, 1 dec)x2, (1 bo, 8 dc, 1 dec)x2 (60)
Rnd 48: (8 dc, 1 dec) x6 (54)
Rnd 49: (7 dc, 1 dec) (48)
Rnd 50: (6 dc, 1 dec)x6 (42)
Rnd 51: (5 dc, 1 dec)x6 (36)
Rnd 52: (4 dc, 1 dec)x6 (30)
Rnd 53: (3 dc, 1 dec)x6 (24)
Rnd 54: (2 dc, 1 dec)x6 (18)
Add generously with stuffing for the last part to make him nice and compact.
Rnd 55: (1 dc, 1 dec)x6 (12)
Rnd 56: (1 dec)x6 (6)
Break the yarn. Sew the hole closed and hide the thread inside the body.
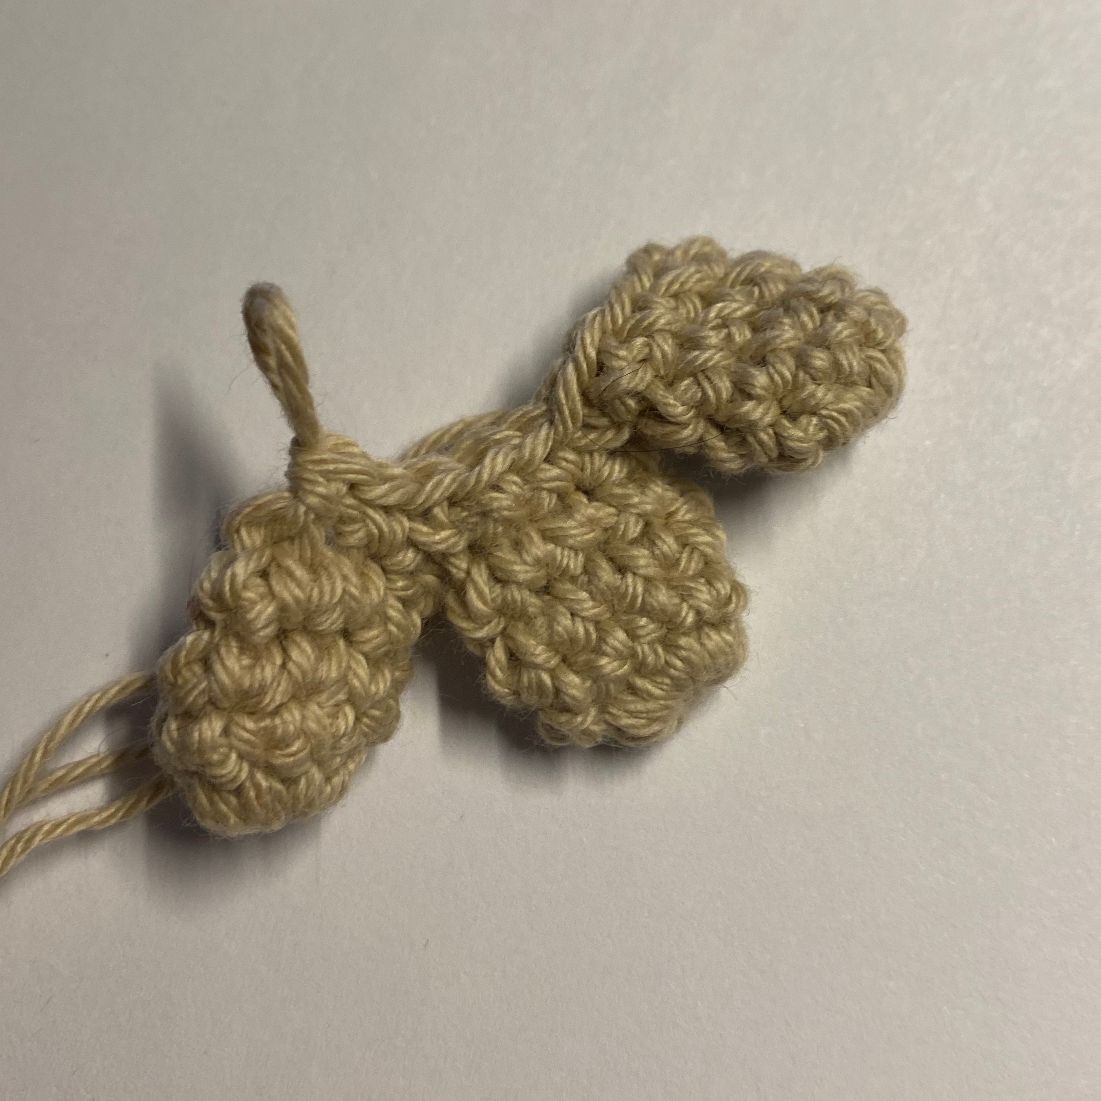
Arms (beige+brown), make 2:
The arms consist of 3 fingers. First, you make the small fingers (Finger 2+3):
Start with beige:
Rnd 1: 6 dc in a mr (6)
Rnd 2-3: 1 dc in all 6 s (6)
Break the yarn
Then to Finger 1, still beige:
Rnd 1: 6 dc in a mr (6)
Rnd 2-4: 1 dc in all 6 s (6)
You now crochet from the 1st finger to the 2 other fingers:
Rnd 5: Insert the hook in Finger 2 and crochet 1 dc in the next 3 s. You then insert the hook in Finger 3 and crochet 1 dc in all 6 s. You then go back to Finger 2, crochet 1 dc in the next 3 s, and lastly, you go to Finger 1 and crochet 1 dc in the last 6 s (18)
Rnd 6-7: 1 dc all 18 s (18)
Rnd 8: (4 dc, 1 dec)x3 (15)
Change to brown
Rnd 9-10: 1 dc in all 15 s (15)
Rnd 11: (3 dc, 1 dec)x3 (12)
Rnd 12-13: 1 dc in all 12 s (12)
Break the yarn and lightly stuff the arms with fibrefill. Sew the arms on at an angle on rnd 26-28 and let Finger 1 be the in the front.

Foot (beige), make 2:
Just like the hands, the feet consist of 3 toes:
Toe 2+3:
Rnd 1: 8 dc in a mr (8)
Rnd 2-4: 1 dc in all 8 s (8)
Break the yarn
Then to Toe 1:
Rnd 1: 8 dc in a mr (8)
Rnd 2-4: 1 dc in all 8 s (8)
You now crochet from Toe 1 to the two other toes:
Rnd 5: Insert the hook into Toe 2 and crochet 1 dc in the next 4 s. You then insert the hook in Toe 3, and crochet 1 dc in all 8 s. You now go back to Toe 2, crochet 1 dc in the next 4 s, and lastly, you go to Toe 1 and crochet 1 dc in the last 8 s (24)
Rnd 6-7: 1 dc all 24 s (24)
Rnd 8: (2 dc, 1 dec)x6 (18)
Rnd 9-11: 1 dc in all 18 s (18)
Rnd 12: close the foot by crocheting 2 stitches with 1 sl st in the next 9 s
Break the yarn, and do NOT stuff the feet. Sew them on around the middle of the body by rnd 45-49. He should be able to keep the balance with the feet on.
Bowtie (turquoise and light pink)
Start with turquoise and make a ch-chain of 30 ch, join the chain with 1 sl st. Make sure it does not twist around.
Rnd 1: 1 dc in all 30 s (30).
Follow the diagram below, and make dc alternating between turquoise and pink. Remember to change the colour on the previous stitch, when you have two loops on the hook grab the yarn (with the new colour) again and draw it through the two loops.
Rnd 2-6: 1 dc in all 30 s (30)
Break the yarn.
The middle of the bowtie is made with 15 ch. Turn the work and start in the 2nd stitch from the crochet hook.
Rnd 1: 1 dc in all 14 s, 1 turning-ch (14)
Rnd 2: 1 dc in all 14 s (14)
Break the yarn and sew the middle of the bowtie onto the other part. The bowtie is placed in the middle of the nose at round 26-27. You can choose whether you want to sew the bowtie on, tie it around the neck, or sew on a snap fastener, as I have done. Using a snap fastener allows you to change out his bowtie later on.
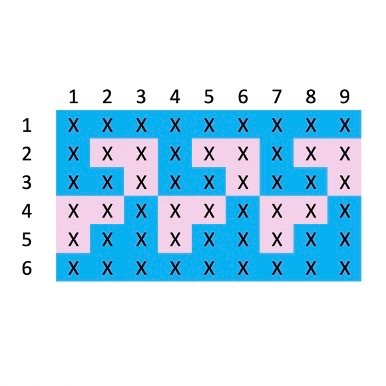
Diagram explanation:
Horizontal row: stitches
Vertical row: rounds
Voila
You have now finished Henry the Hedgehog. If you are on social media, you are welcome to share your results using the hashtag #ritohobby – You are also welcome to tag me, the designer (@homemade.by.frost) on Instagram, so I can see your version.
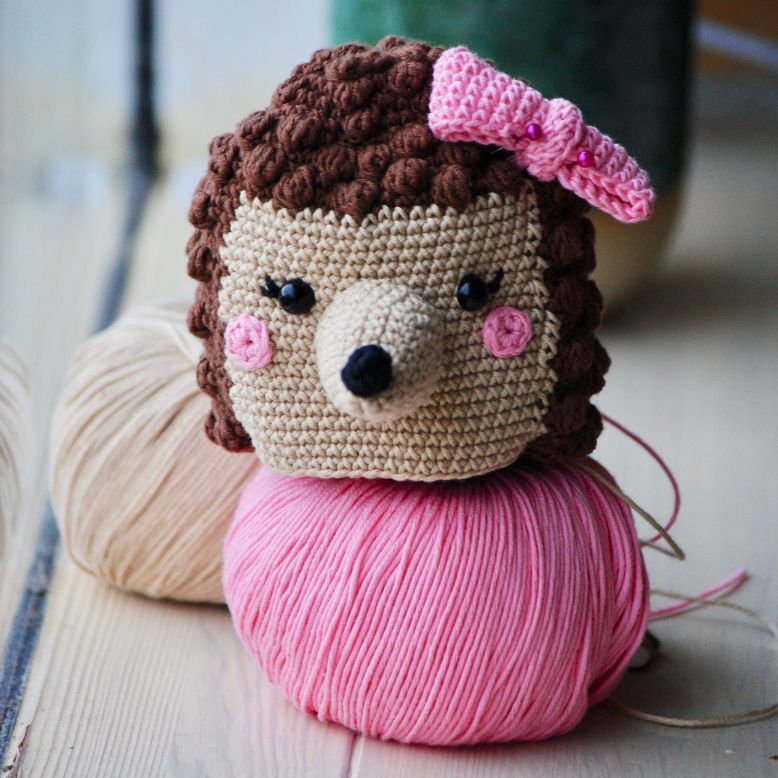
Do you want a Holly instead of a Henry?
Follow the general crochet pattern for Henry, but for the body, you skip rnd 38-41 (4 rounds). Embroider eyelashes on the eyes, and lastly, you can change the bowtie to a simple bow that you place by one the ears.
Design by: @homemade.by.frost(Amalie Frost)
 Österreich
  Belgique
  Bosna i Hercegovina
  България
  Κύπρος
  Česká republika
  Danmark
  Eesti
Eesti  Føroyar
  Suomi
Suomi  France
  Deutschland
  Ελλάδα
  Kalaallit Nunaat
  Magyarország
  Ísland
  Ireland
  Italia
  Latvija
  Liechtenstein
  Lietuva
  Lëtzebuerg
  Malta
Malta  Isle of Man
  Nederland
  Norge
Norge  Polska
  Portugal
  România
  Slovensko
  Slovenija
  España
  Sverige
  Schweiz
  Ukraїna
  United Kingdom