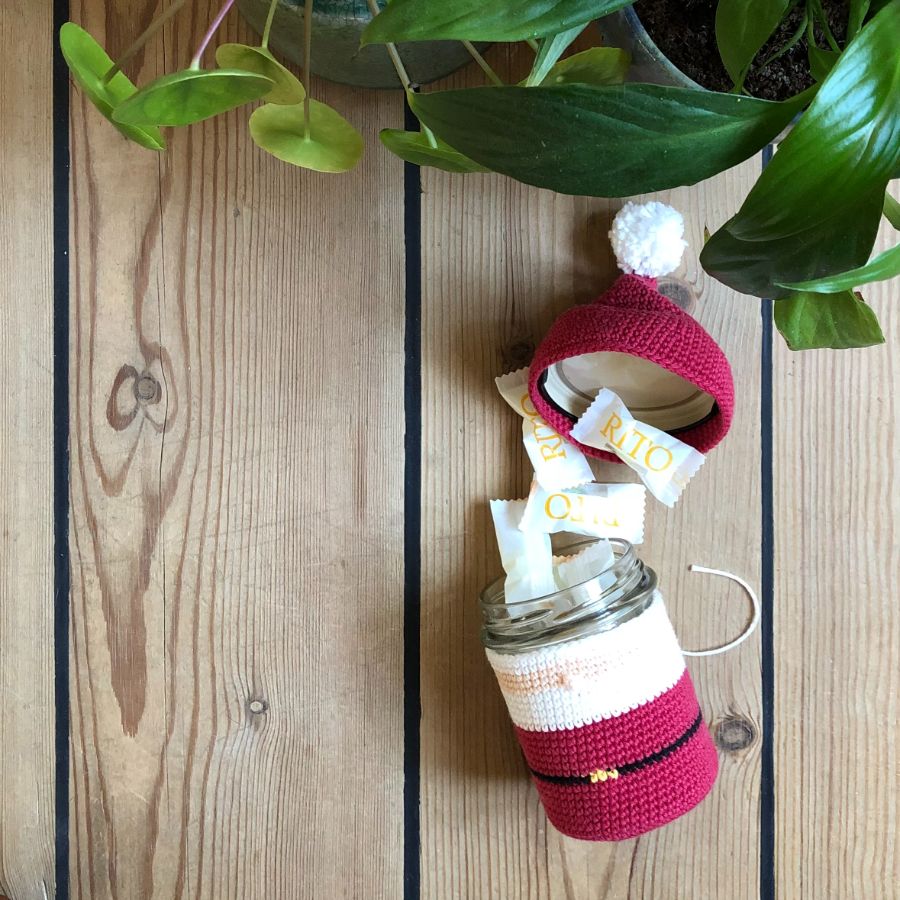
Christmas crochet pattern for crocheted elf glass

A Christmas elf on a glass is perfect as a little present or as a means to store your Christmas candies. The pattern is made so you can adjust it to fit the jars you have in your cupboard or fridge. The Elf is crocheted from the bottom up.
Materials
- Crochet hooks size 3 (alternatively a smaller hook depending on your gauge)
- Infinity Hearts Lotus 8/4
- Infinity Hearts Rose 8/4
- Needle for fastening ends
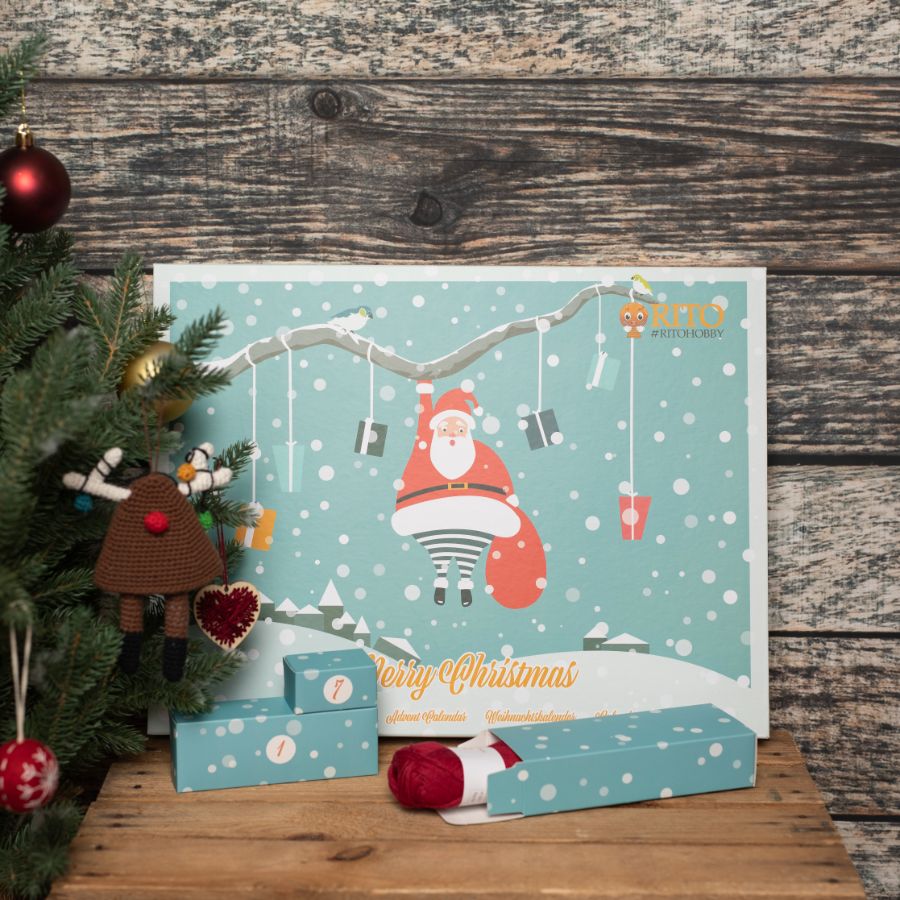
For the Christmas glass, you will need the following items from the Rito Christmas calendar
During December, the Rito Knitting/Crocheting Christmas Calendar will provide you with materials to follow this lovely Christmas glass pattern. Here you can see the different materials you will need and which door the different materials are behind:
- Yellow (belt buckle)
- Red (body + hat)
- Orange (skin)
- White (beard + tassel)
- Black (belt + eyes)
Yarn consumption
- Infinity Hearts Lotus - 19 Christmas red, approx 20 grams
- Infinity Hearts Lotus - 01 White, approx. 4 grams
- Infinity Hearts Lotus - 11 Yellow, a little for the belt
- Infinity Hearts Lotus - 03 Black, a little for the belt and eyes
- Infinity Hearts Rose - 30 Orange, a little for the face
Abbreviations
dc = double crochet
mr = magic ring
inc = increase, two double crochets in the same stitch
Step by step
The actual pattern measurements depend on the jar you found. The glass we have used in the pattern has a diameter of 6 cm at the bottom and is 7 cm high without the lid. You can easily use another glass, but in that case you should keep an eye on how the pattern fits your glass. It is best to find a glass that has straight edges (without too much rounding), but others can also be used.
Start in red
1 round: 6 dc in a magic ring (6)
2nd round: 2 dc in every st (12)
3rd round: (1 dc, inc) x 6 (24)
4th round: (2 dc, inc) x 6 (30)
5th round: (3 dc, inc) x 6 (36)
6th round: (4 dc, inc) x 6 (42)
7th round: (5 dc, inc) x 6 (48)
This size fits a glass with a diameter of approx. 6 cm. If your glass is thicker or thinner, you can make either fewer or more rounds with 6 increases. Turn the glass upside down, place the project on the bottom and look down the edge to see if it matches the widest point of your glass. If it's too small, the elf won't fit on the glass. If the elf is too big, it will slide off.
8-15 round: dc in all sts (48)
This should be just under a third of the height of the glass. Add more rounds if needed or work fewer depending on the height of your glass.
Change to Black
16 round: dc in all - NOTE! 3 yellow dc in the middle (48)
Change to Red
17-22 round: dc in all sts (48)
By now you should have crocheted just over half the height of your glass, otherwise give it a few more rounds in Red.
Change to White
23-28 round: dc in all sts
This is about half of the remaining height of the glass, or a little under a quarter of the entire height of the glass.
Change to Orange
29 round: dc in all sts - NOTE! Make a bubble stitch just above the belt, this is the nose
30-31 round: dc in all sts
Embroider two eyes with Black yarn on round 30. They are embroidered 8 stitches apart.
Change to White
32-33 round: dc in all
If your jar has a bottleneck at the top, consider making a few dec on rounds 32 and 33.

HAT:
Crochet in Red
1st round: 4 dc in a magic ring (4)
2nd round: dc in all sts (4)
3rd round: (2in1) x 4 (8)
4-5 round: dc in all sts (8)
6 round: (1 dc, 2in1) x 4 (12)
7-8 round: dc in all sts (12)
9 round: (1 dc, 2in1) x 6 (18)
10 round: dc in all sts (18)
11 round: (2 dc, 2in1) x 6 (24)
12 round: dc in all sts (24)
13 round: (3 dc, 2in1) x 6 (30)
14 round: (4 dc, 2in1) x 6 (36)
15 round: (5 dc, 2in1) x 6 (42)
16 rounds: (6 dc, 2i1) x 6 (48)
17 round: (7 dc, 2i1) x 6 (54)
18 round: (8 dc, 2in1) x 6 (60)
Again, you have to pay attention to the size of your glass. If not, add some rounds with increases, or work fewer rounds with increases.
19-22 round: dc in all sts (60)
23 round: (9 dc, 2in1) x 6 (66)
24-27 round: dc in all sts (66)
The hat should overlap with the body, if it doesn't match what you have now you can crochet a few more rounds.
TASSEL:
Make a small tassel on the elf hat. You can do this with two small cardboard slices. The method is as follows:
- Cut two circles of cardboard and make a hole in the middle of both of them. The diameter of the cardboard discs indicates the approximate size of your tassel. You therefore make the cardboard discs according to the tassel size you feel best suits your elf glass.
- You now have two cardboard circles. Place these on top of each other, cut through the circle in one place and fold the edges up a few mm where you have cut. This is the hole you pull the yarn through.
- Wrap the yarn evenly around the slices (the slices should be right on top of each other). Do not wrap the yarn tightly.
- If necessary, start opposite of where you cut through the circles. Then wrap the yarn around the cardboard disc evenly back and forth until the hole in the middle is filled with yarn or there is no more yarn.
- Now take a pair of scissors and insert them into the hole you cut earlier and between the cardboard discs. Cut off the yarn on the outside of the circles.
- Once you have cut all the way around, take a piece of string and tie the yarn in the middle by tying it between the cardboard discs and all the way around. Tie some tight knots to make sure it holds.
- Then remove the cardboard discs and rearrange the yarn by twisting it. Trim to make a round ball.
- Violá! You have now made your own tassel.
If you don't want to use cardboard discs, you can use a pompom maker for your Santa hat tassel.
Assembly and finishing
Staple the ends together, pull the elf onto the glass - you can glue him in place if you want, so he doesn't run anywhere - and fill the glass with sweets!

 Österreich
  Belgique
  Bosna i Hercegovina
  България
  Κύπρος
  Česká republika
  Danmark
  Eesti
Eesti  Føroyar
  Suomi
Suomi  France
  Deutschland
  Ελλάδα
  Kalaallit Nunaat
  Magyarország
  Ísland
  Ireland
  Italia
  Latvija
  Liechtenstein
  Lietuva
  Lëtzebuerg
  Malta
Malta  Isle of Man
  Nederland
  Norge
Norge  Polska
  Portugal
  România
  Slovensko
  Slovenija
  España
  Sverige
  Schweiz
  Ukraїna
  United Kingdom